Monday, May 27, 2013

The Art of Stacking Images

Most photography enthusiast who knows a bit about manual control is aware that higher ISO means brighter image at the expense of grainier image and in the case of digital cameras, higher noise. This is true for all types of digital cameras, be it pro-level DSLRs to your average Joe's point and shoot digicams. Noise in small sensor cameras are more prone to noise due to several reasons. Digicams typically uses a small sensor and lens, this translates to less light received by the sensor. In order to achieve the same brightness at a typical sensitivity of ISO 100, for example, the amplifier gain needs to be increased. As with any electronic amplifiers, high gain equals higher noise level.

A very noisy image

There are several ways to reduce noise. One way is to apply digital blurring. This lets the user perceive the effect of reduced noise at the expense of sharpness. This technique, although widely used, doesn't really reduce the noise, but rather blend the noise color, eg. pink pixel, with the surrounding pixels. Most image noise cleaning software uses this technique. A better way of decreasing noise is by stacking images. This technique actually increases the signal-to-noise (S/N) ratio of the image, by combining several images to form one cleaner image. This technique although good, needs to have a stationary target and several images. On moving targets, you're out of luck.

After blurring, noise is reduced at the expense of sharpness


A simple explanation of this technique is this. Noise is assumed to be on random pixels and actual image data is at a consistent point. When 2 images with a similar signals are averaged out, the result will be similar (eg. average of 1 and 1 is 1). Noise on the other hand, due to its' random nature, may not exists on the same pixel location between 2 images(eg. average of 1 and 0 is 0.5). By combining 2 images, the signal-to-noise ratio is increased, meaning noise is reduced by half. By combining many images together, noise becomes negligible.

The illustration below shows the result of stacking 3 images. As more images are combined, the noise signal becomes weaker and weaker until only the real signal remains.


Sample image:

1 image, no stacking

2 images stacked

4 images stacked

 8 images stacked

From the sample image above, the difference of a single image and 8 stacked images is obvious. The amount of graininess is greatly reduced when many images are combined. After stacking, the image will be cleaner and we can post process it a bit to improve the sharpness. Sharpening an image can induce some noise specks, but it will be up to the person how much he wants to sharpen the image.


To stack manually, images are loaded as layers. To stack 2 images, for example, one image's opacity should be set to 50% making it half transparent, the bottom image is set to 100%. Once aligned, merge the 2 images. For more images, repeat the process merging 2 at a time. Several images can be merged together at the same time, but aligning them will be harder and opacity ratios will be calculated, for example when using 3 images, set the 3 layer's opacity to 100%, 66%, 33% respectively.

Screenshot of Gimp using layers to merge images


In wildlife photography, stacking more than 1 image is harder because an animal tends to move and vegetations can move due to wind. There are some cases where they just stay still, like the bird picture above. The same technique is widely employed in astrophotography.

While most celestial objects do move a lot as well, their perceived motion is very slow from our vantage point several million miles away. The effects of heat wave and atmospheric disturbances are also nullified by stacking. Stacking, not only reduces the noise, it can also improve the amount of details in an image. Astrophotographers usually stack dozens of frames for deep sky image and hundreds to thousands of images for planetary and high magnification images. With thousands of frames from a video clip, they don't manually do it by hand, there exists tools like Registax to help automate the task of aligning and stacking images.

An example of Jupiter image is shown below:

Clockwise from top-left: Single frame, stacked image, wavelet filter applied, post-processed


Wednesday, May 22, 2013

Bukit Batok and Little Guilin 2013-05-18

I went back to Bukit Batok Nature Reserve to do some unfinished business - photograph more birds. When I arrived there, I was initially a bit disappointed because I didn't see any birds aside from those trash bird called Javan myna. As I approached the marker to the War memorial, I was delighted to see a white-crested laughingtrush perched on the sign post. I quickly too some shots, fortunately I was able to get some decent ones before it flew away.

White-crested laughingtrush


I  tried to follow it and was surprised that it was not very shy. While it was looking for food under the trees, I was able to get a better shot but was forced to use flash because it was dark and the bird is constantly moving.


Later, while walking the trail, I also saw a banded woodpecker, but it was always moving behind the trees making a steady shot almost impossible. My best attempt was a bit dark, but I was happy to be able to photograph it.


Banded woodpecker

I also saw another pink necked green pigeon at one part of the trail.

Pink necked green pigeon

 I walked around and was also able to see, but not photograph, some chestnut cheeked babbler.

After getting tired that I wasn't able to see more birds, I decided to call it a day and head back home. On my way out of the reserve/park, I looked at a sign and saw that there's another park nearby, the Butik Timah Nature Park also dubbed The Little Guilin. I decided to visit the place as well.

After a long walk, I reached the pond and saw the cliff which indeed looked like the typical scenery in Guilin, China. It was just 2 rocks unlike the numerous rock formations in the real Guilin.


The park's highlight is this rock formation and nothing else. When I arrived there it was already near lunchtime and I was getting hungry, so I quickly snapped some pictures and left.

After lunch, I got home and did a little research. I found out that this park is a former quarry and known for its' horror stories about ghosts and some restless spirits. :)


Tuesday, May 7, 2013

Sungei Buloh Nature Reserve 2013-05-04

I only hear about Sungei Buloh when Bob told me about this place. With a bit of research, I figured out the best way to get to this place. It's not as famous as other nature reserves like MacRitchie or Bukit Timah, but it's still accessible by public transportation.

I took the MRT to Kranji station. When I stepped out of the station, I immediately saw the bus I should be taking (bus 925) outside. I walked to the bus, but it was so crowded and many people are still waiting outside in order to get it. I didn't bother trying to force myself in, because from the looks of it, I already knew I won't be able to. I didn't have a choice but to wait a little longer. After about 10 minutes or so, another one came and I was able to get inside. After 15 minutes, I arrived at my destination - the Sungei Buloh carpark. The place was a bit deserted. Very few people can be seen walking there, only some vehicles. When I was walking, I had a feeling I might make a wrong turn since there's no one around to ask for direction although I'm pretty sure the entrance is just around the corner. Luckily at one corner, there's a small sign to the reserve.

Scarecrow near the reserve entrance

After 15 minutes of walking the narrow 2-lane road, I reached the visitor area. The road doesn't look like the usual Singaporean road that has a pedestrian sidewalk beside the main road. While walking, I was able to photograph some doves and an olive-backed sunbird as I followed the sign towards the visitor area, paid the entrance fee which is 1 Singapore Dollar and entered the reserve. During weekdays, the entrance to the reserve is free but not on weekends.
Red turtledove

 Spotted dove

Olive-backed sunbird
    

After the visitor entrance, you have to cross a bridge to reach the main trail. There are 3 routes in the reserve, Route 1 being the shortest and 3 the longest. There are many viewing sheds/observation screens along the trail, several ponds and a couple of towers. Route 1 is basically a short loop around the reserve. While walking the trail, I saw a few monitor lizards, squirrels, a couple of pink-necked green pigeon, some wader in a pond, some oive backed sunbird, a white collared kingfisher, a cuckoo sp, an oriental magpie-robin, olive-backed sunbirds and heard a few calls which I couldn't identify.

 Whimbrel

Sandpipers and red shanks


Little egret and little heron

Cuckoo sp

Pied fantail


Oriental magpie-robin

 Pink-necked green pigeon


 White-breasted waterhen

In the middle of route 1 is a 4 or 5 floor viewing tower called Aerie. I climbed up the tower to get a good view of the reserve.

 Aerie from a distance


After I reached the point where I started, it's still very early, so I decided to visit all 3 routes. I need to take Route 1 again up to the junction which leads to route 2. During my second trip on route 1, I was luckier than the first that I was able to photograph the Copper throated sunbird which landed just a few meters from me. I was taking shots by the dozens but only a few were good. The trail was a bit dark with lots of vegetations, so I used a slower shutter speed leading to a lot of blurry shots. I was also able to capture the active Ashy tailorbird.


Copper-throated sunbird


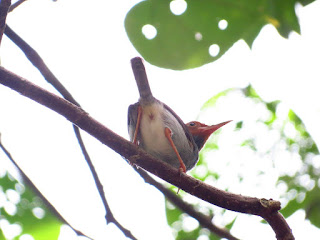
Ashy tailorbird

Routes 2 and 3 starts in the middle of route 1 and branch off to different areas along the reserve. Route 2 features the prawn pond and the tower hide. The 3rd route also features a Mangrove Arboretum, which has a wooden bridge leading to another section of Route 1. At the mangrove bridge, there are a lot of mudskippers and small crabs, a species with red claws.

Mangrove Arboretum


Some parts of the reserve is heavily infested with mosquitoes. I didn't brought any repellent so I was bitten a lot.

After my walk around the 3 routes, I decided to leave the reserve. While crossing the bridge, an employee of the reserve called me and pointed to me a salt-water crocodile in one of the ponds.


At the visitor center, I wander around at the exhibit hall, looked at the display then had a short break outside to eat the food I brought with me since it is already past 1 in the afternoon and I'm starving. I left the reserve, walked back towards the bus stop and head home with a smile on my face. :)

Here are some other pictures I took.

 View from the tower Aerie

Johor Bahru from a distance